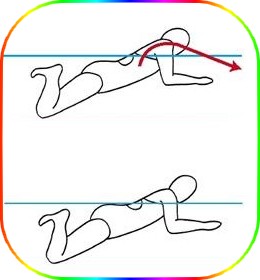
Breaststroke is the only stroke with a recovery that passes through the water rather than over it, leading to the potential for a great deal of drag. To overcome this drag, the breaststroke recovery must be an active part of the stroke, rather than a resting phase, as in other strokes. The resting phase in the breaststroke comes after the recovery, during the glide. Some swimmers have tried to avoid drag by developing over-the-water recovery styles, with varying degrees of success. For the most part, swimmers have chosen to overcome the drag of the traditional in water recovery by increasing speed into, and streamlining during and after the recovery. The goal of the following breaststroke recovery drills is to minimize drag by quickening the transition between arm stroke and recovery, and developing a long, fast and compact recovery that works with the line of the stroke.
Growing Your Recovery
THE PURPOSE OF THIS DRILL
- Achieving the longest recovery
- Using your elbows to extend recovery
- Using your chest to extend recovery
HOW TO DO THIS DRILL
- Step 1 : - Stand in waist deep water, facing the pool wall. Bow forward so that your chin is on the surface the water. Look down and forward, preparing to watch your breaststroke arm stroke and recovery. Extend your arms in front of you so your fingertips touch the wall. Your hands should be slightly submerged in the water. Now, begin the arm stroke, compact, quick through the corners, maintaining firm wrists throughout, and high elbows until the last part of the insweep. When your hands finish the insweep, return them to the extended position, fingertips touching the wall in front of you.
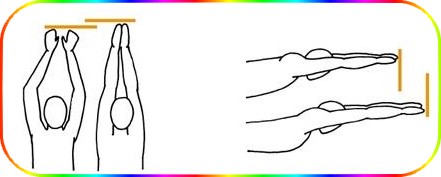
- Step 2 : - Take one step back - the length of your foot. Maintaining your chin on the surface of the water, do another breaststroke arm stroke, compact, quick through the corners, firm wrists throughout, high elbows until the last part of the insweep. At the end of the insweep, form a point with the fingertips of both hands, and drive your hands and elbows forward with speed. As your hands reach toward the wall, bring your forearms as close together as possible. Your arms should form a long arrowhead, from hands to shoulders. Notice that simply by straightening your arms more and creating a narrow leading edge with your hands, forearms and elbows, you have increased the length of your recovery, and are able to touch the wall.
- Step 3 : - Take another step back - the length of your foot. With your chin still on the surface of the water, do another breaststroke arm stroke, compact, quick at the corners, firm wrists, high elbows. At the end of the insweep, with your fingertips together and pointed forward, drive your hands and elbows forward with speed, narrowing the space between your forearms as you reach. Before your hands have reached full extension, drop your chest down and forward into the water as you reach for the wall. Notice that using your chest in the recovery action, you have increased the length of your recovery even more, and are able to touch the wall.
- Step 4 : - Now practice growing your recovery while swimming. Push off the wall face down, achieving a firm core and good floating position. Begin the breaststroke arm stroke. As your hands finish the insweep, return your arms to the front extended position, making a tight arrow with your arms. Drive your hands and elbows forward, bringing your forearms as close together as you can. With your arms forming a narrow leading edge, drop your chest down into the water. Do a breaststroke kick as your chest drops. Feel your body move forward in a streamlined glide. Hold that position for three to five seconds before starting another stroke. Continue to the far end of the pool.
DRILL FEEDBACK CHART
| Problem | Modification |
| I can't get my elbows very close together. | Everyone's flexibility is different. Just get your elbows closer than they were originally. You can also try placing your hands palms together during recovery and see if this moves your forearms closer. |
| When I use my chest, I lose my footing and fall forward. | This actually shows that you have succeeded in shifting your weight forward for encouraging a more productive glide, as well as a longer recovery. Keep it up! |
| When I drop my chest into the water, my face submerges. | You might be dropping your chest too far downward. Try it again with less depth. Try to make your chest join the forward motion of your arms as they extend forward. |
Shoot to Streamline
THE PURPOSE OF THIS DRILL
- Learning to accelerate into the recovery
- Recovering with the rocking motion of the stroke
- Eliminating any pause between insweep and recovery
HOW TO DO THIS DRILL
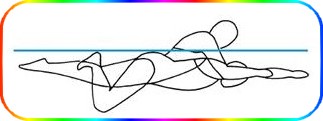
- Step 1 : - Push off the wall, preparing to do the breaststroke, your arms extended fully in front of you, forming the point of an arrow from your hands to your shoulders. Achieve a downhill floating position. Begin a compact arm stroke, that is quick through the corners.
- Step 2 : - Maintain firm wrists throughout the stroke, and high elbows until the last part of the insweep, when your elbows fold inward in front of your rib cage. As your elbows fold in, notice that your hands come together in a sort of praying position. This is the breaststroke breathing position, a necessary but drag-producing point in the stroke.
- Step 3 : - Getting back to the downhill position quickly is crucial in retaining your hard-earned forward momentum. To achieve this, the recovery must continue the forward motion of the breaststroke, avoiding any pause after the insweep. From the praying position, shoot your hands and elbows forward at lightning speed, with your forearms close together as you drop your chest and head down forward. Kick when your arms are in mid-recovery. Glide for three to five seconds in a fully streamlined position.
- Step 4 : - Do another stroke. Use a quick outsweep, and a quicker insweep. Make the recovery quickest of all. Do it again, accelerating through the entire stroke, then shooting your arms forward in the recovery. Notice that the narrower your recovery is, the faster it cuts through the water. Notice too, that by eliminating any pause in the praying position, the recovering arms add to the forward momentum of the arm stroke.
- Step 5 : - Continue practicing the narrowest recovery possible, eliminating any stall between the insweep and the recovery. Keep practicing until your arm stroke and recovery have become one continuous, accelerating action. Catch the forward momentum of the stroke and shoot to the streamline. Glide for three to five seconds after each recovery.
DRILL FEEDBACK CHART
| Problem | |
| I have a pause in the praying position. | To avoid the slowing effects of drag, it is very important not to pause in this position. Make sure that you are preparing to breathe at the corners and not later, or you can get stuck in an uphill position, and miss the opportunity to time your recovery to the forward motion of the stroke. |
| My hands end up palms together at the end of the recovery. | That is fine. It is also fine if your palms face down. Either way, after gliding, you will turn your palms outward to begin the arm stroke. The bottom line is that for a streamlined recovery, the arms and hands should slice through the water and form a narrow leading edge in front of your body. |
| My recovery aims uphill. | Be sure your arms are aligned forward from the shoulders, elbows and wrists. Check the direction your fingertips are pointing at the end of your recovery. It should be forward, not upward. |
Fold and Shrug
THE PURPOSE OF THIS DRILL
- Adding speed to the recovery
- Increasing momentum into the glide
- Learning to rest after the recovery
HOW TO DO THIS DRILL
- Step 1: Push off the wall preparing to swim breaststroke, arms extended. Achieve the downhill floating position. Begin your arm stroke, sweeping out, then accelerate around the corners, and in towards the middle to the praying position before recovery. This is also the point in the stroke when you draw your heels up toward your buttocks, preparing to start the power phase of your kick. In this position, your head and chest should be higher than your hips. You have a brief window of opportunity for breathing between the corners and the praying position.
- Step 2: As your elbows fold quickly inward to the praying position, shrug your shoulders up. Then, as you transition to your quick, narrow recovery, shrug your shoulders forward and down. Notice that with this shoulder shrug, your upper body becomes more involved in the recovery. Kick as your arms approach the streamlined position. Glide and rest for three to five seconds.
- Step 3: Do another stroke. Accelerate through the outsweep corners and insweep. Fold your elbow in at the end of the insweep and shrug your shoulders up, then forward and down into the recovery. Notice that the shrug helps keep your momentum going through the praying position, where a disadvantageous pause often occurs. As you shoot your hands and forearms forward, and drop your chest down and forward, notice too that your recovery carries more speed. Kick as your arms approach the streamlined position. Glide and rest for three to five seconds.
- Step 4: Do another stroke. Quick outsweep, turn the corners and accelerate into the insweep. Approach the praying position and shrug your shoulders up as your elbows fold in front of your chest, then down and forward giving more speed to the recovery. Notice that you are able to achieve a greater downhill streamline with the shrug helping to shift your weight forward. Glide and rest for three to five seconds.
- Step 5: Continue to practice for several lengths of the pool. Sweep out, then in. Fold and shrug. Feel the momentum of the stroke follow your arms into their recovery and glide.
DRILL FEEDBACK CHART
| Problem | Modification |
| The shrug helps me go up, but not forward. | You have to shrug your shoulders up and then forward and down to feel it assist in the speed of the recovery. Try it on land first, in the mirror. With your arms at your sides, shrug your shoulders up, then roll them forward and down. Now trace the path of your stroke in the air, adding the shrug up then forward and down, as you go through the praying position. Feel the shrug forward add momentum to your recovery and glide. |
| My elbows fold into my rib cage, not in front of it. | Try beginning the shrug earlier, before your elbows fold in too far. Also make sure that your elbows are high and firm coming into the insweep, and remain high until the last few seconds. |
| My streamline is flat, not downhill. | Make sure you are looking at the bottom of the pool and not forward during your streamline. Also, realize that the degree of the downhill float is very subtle. It shouldn't be so severe that you are aiming at the bottom of the pool, or so deep that you have to lift yourself up to the surface with the next stroke. As long as your chest is slightly lower than your hips, you have achieved a downhill position, and will move forward better during the glide than if your hips and chest were equal in depth, or worse, that your hips were the lowest part of your float. |