In an effort to overcome drag, and increase forward motion, the breaststroke arm stroke has evolved immensely over time. While it has remained a simultaneous stroke, many theories about what the arms do have been developed. The arm stroke has been described as a heart-shaped pull, a box-shaped pull, even a straight-arm circle, half formed with each arm. It is now accepted that the legs are where the majority of the potential power is in breaststroke, so the arm stroke has evolved into a compact, lateral action, with its main function being to balance the action of the kick, and to facilitate breathing. The goal of the following arm stroke drills for breaststroke is to learn to enhance the breaststroke balance and breathing using a quick, compact arm stroke.
3D Breaststroke Arms
THE PURPOSE OF THIS DRILL
- Getting the most out of the arm stroke
- Using an accelerating stroke
- Maintaining a compact stroke
HOW TO DO THIS DRILL
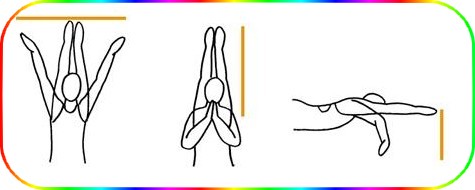
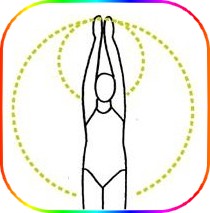
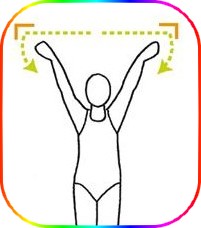
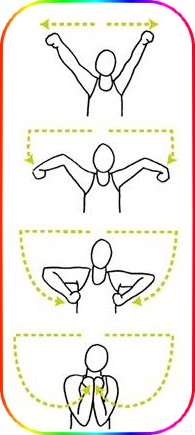
- Step 1 : - Push off the wall for breaststroke. Sweep outward until your hands are slightly outside your shoulders, forming a Y. Your arms should be straight at this point in the stroke. This is the widest point in the breaststroke arm stroke. From there, sweep your hands inward until they meet under your chin. This is the narrowest point in the breaststroke arm stroke. Practice to the far end of the pool, identifying the wide and the narrow points of the stroke.
- Step 2 : - Again push off the wall for the breaststroke, arms extended. Sweep outward, with your fingertips just below the surface of the water. This is the shallowest point in the breaststroke arm stroke. From there, holding your elbows firm, sweep your hands down and inward, tracing a half circle until your hands meet in the middle, under your chin. This is the deepest point in the breaststroke arm stroke. Practice to the far end of the pool, identifying the shallow and the deep points of the stroke.
- Step 3 : - Again push off the wall for the breaststroke. Start the stroke with your arms completely extended. This is the longest point in the breaststroke arm stroke. Sweep outward, then inward. Your hands meet under your chin. This is the shortest point in the breaststroke arm stroke. Practice to the far end of the pool, identifying the long and the short points of the stroke.
- Step 4 : - Continue swimming breaststroke for several lengths of the pool, observing the three dimensional path of the stroke. Notice the complete area of the arm stroke, by feeling the widest and narrowest points, the shallowest and deepest points, and, the longest and shortest points.
DRILL FEEDBACK CHART
| Problem | Modification |
| I am not producing much forward motion. | Since the breaststroke arm stroke is much more compact than the other strokes, it produces much less forward motion. It is therefore even more important to make the most of the space that you have to work with by applying pressure throughout the three dimensional space. |
| My elbows don't stay high when I sweep inward. | To make the most of the insweep, it is important to maintain high, still elbows. When your hands meet in the middle, your elbows can fold in toward your sides. |
| I am not feeling the Y. | It is important to sweep outward with straight arms, because the insweep that follows uses the longest to shortest dimension of the stroke to accelerate the arm stroke. If your hands have already left the long position during the outsweep, the insweep will be slower and less effective. |
Breaststroke Sculling
THE PURPOSE OF THIS DRILL
- Learning to use lateral strokes
- Holding on to the water
- Experiencing a high elbow scull
HOW TO DO THIS DRILL
- Step 1 : - Push off the wall, arms extended, face in the water. Use core stability to maintain a good floating position. If necessary, use a gentle but continuous flutter kick. Keeping your hands completely submerged at least two inches under the surface of the water, begin a sculling action with your hands, maintaining firm wrists. Your hands should be tracing a mirror image of each other. Press the water outward with the palms of your hands, positioning your thumbs lower than your pinkies.
- Step 2 : - After pressing outward just wider than your shoulders, reverse your hand pitch so your thumbs are higher than your pinkies and press the water inward with the palms of your hands.
- Step 3 : - Before your hands meet, again switch the pitch of your hands to thumbs-down and press outward. Produce a continuous lateral sculling action for one minute. To breathe, press your chin forward gently.
- Step 4 : - Increase your hand speed, maintaining high elbows and firm wrists. Trace sideways figure eights with each hand. Practice until you feel you are holding onto the water in both directions, even as you change directions.
- Step 5 : - Without increasing the width, depth or length of your scull, and without adding or increasing kicking, attempt to create forward motion with your skull. Use your whole arm to trace your figure eights, maintaining firm wrists, and high elbows. Practice until you can move to the far end of the pool.
DRILL FEEDBACK CHART
| Problem | Modification |
| I am feeling bubbles during my inward scull. | This probably means that your hands are not quite deep enough in the water, and are catching air as you press outward or while changing directions. Keep your hands totally submerged the whole time. |
| I lose my hold on the water as I change directions. | Think of a knife spreading peanut butter on a slice of bread. Use your hands in the same way, from one side of the bread to the other, and then back again. Also, maintain your hand speed as you change directions. |
| I am not moving. | Make sure your elbows and wrists are firm. Increase the quickness of your figure eights. Check that your hands are completely submerged. |

Half-stroke Breaststroke
THE PURPOSE OF THIS DRILL
- Learning to use compact strokes
- Using a quick stroke
- Eliminating drag
HOW TO DO THIS DRILL
- Step 1 : - Push off the wall, preparing to do the breaststroke, arms extended, face in the water. Do four arm strokes with your face in the water, watching your hands as they sweep outward, then inward through the path of the stroke. Return your arms to the fully extended position between each stroke. Kick each time your arms approach straight.
- Step 2 : - Take a breath, then do four more strokes. Reduce the width of your arm stroke until your hands stay within your field of vision throughout the stroke. Still return your arms to the fully extended position between each stroke. Notice that a stroke with less width takes much less time to get your arms back to the extended start position.
- Step 3 : - After breathing, do four more strokes maintaining your reduced arm stroke width. Now, watch your hands as they sweep from shallow to deep through the path of the stroke. Again, return your arms to the fully extended position between each stroke. Kick as your arms approach straight.
- Step 4 : - Take a breath, then do four more strokes, reducing the depth of your stroke so that your hands remain within your field of vision throughout the stroke. Still return your arms to the fully extended position between each stroke. Notice that a stroke with less depth takes much less time and effort to get your arms back to the extended start position.
- Step 5 : - Practice the reduced stroke again. Make it compact and quick. It should feel like half a stroke. With your face in the water, your hands should remain easily within your sight throughout the arm stroke.
DRILL FEEDBACK CHART
| Problem | Modification |
| I am not getting any pull from half a stroke. | The point of the drill is to keep your stroke compact, entirely within your field of vision, thereby reducing drag and effort. It is your kick that should produce most of the forward motion. |
| I can't see my stroke when my hands are under my chest. | Reduce your stroke until you can see your hands the whole time. Keep your hands and elbows in front of your chest. |
| The arm stroke is now too fast to fit the kick in after each one. | Remember to return to the extended position after each arm stroke. Each arm stroke starts and finishes in that position, giving you more time to kick. |
Med Hassan EL HAOUAT
Corners Drill
THE PURPOSE OF THIS DRILL
- Accelerating into the insweep
- Producing lift without pushing down
- Holding onto the water
HOW TO DO THIS DRILL
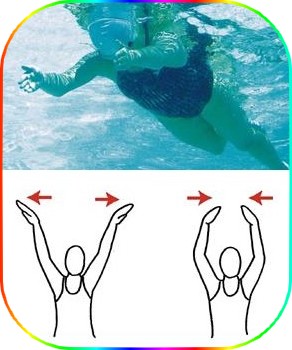
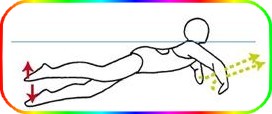
- Step 1 : - Push off the wall for the breaststroke, arms extended. Press your chest into the water, and use core tension and a straight spine to achieve a downhill float. Begin the breaststroke arm stroke, pressing outward with your thumbs low, then inward with your thumbs high. Keep your hands within your range of vision.
- Step 2 : - Do four or five quick strokes, holding on to the water throughout the entire path of the stroke, especially during the transition from outsweep to insweep. It is very important to maintain firm wrists and high elbows during this transition. It should feel like you are turning tight corners with each arm. It is important to feel that you are doing so with your whole arms, not just your hands. Upon arriving at these corners, gather speed for the insweep. Increase your speed as you round the corners. At the end of each insweep, when your hands come together in the middle, push them straight ahead to the extended position.
- Step 3 : - Notice that with a quick enough arm stroke, which accelerates at the corners, you feel the effects of lift, without ever pushing down on the water. Try it again. Increase the speed of your stroke so that you produce noticeable lift in your upper body as your hands transition from outsweep to insweep. Without altering your head position, your face will rise as you begin your quick insweep. Notice that if you maintain a firm core, when your upper body rises, your feet will drop just a bit. Use this opportunity, when your face is naturally at its highest out of the water to get a breath. Then return your face to the water as your hands approach the extended position. Press your chest downward.
- Step 4 : - Continue practicing your quick lateral arm stroke, accelerating at the corners to produce lift. Then, quickly return to the downhill position. Spend half as much time in the breathing position as in the glide position.
DRILL FEEDBACK CHART
| Problem | Modification |
| I don't produce any lift. | Try increasing the speed of your hand at the corners. Maintain your core tension and straight spine, so that when your upper body rises, your feet drop a bit. If your core is not unified, your hips will actually limit the lift effects your arms can achieve at the corners. |
| I don't feel the corners. | If the transition from outsweep to insweep is too gradual, you will not feel it or benefit from it. Make it a tight corner, and accelerate your hands through it. Also make sure you are changing the pitch of your hands, going into the corners with your thumbs down, and coming out with your thumbs up. |
| I can't get back to the glide position. | As your arms begin to extend, and your face returns to the water, drop your chest lower into the water. Make sure you are looking at the bottom of the pool and not forward. |
Med Hassan EL HAOUAT
Hand Speed Drill
THE PURPOSE OF THIS DRILL
- Observing a compact arm stroke
- Using a quick arm stroke
- Holding on to the water
HOW TO DO THIS DRILL
- Step 1 : - Push off the wall, arms extended, face forward out of the water, chin on the surface. Use core tension to maintain a good floating position. Begin doing the breaststroke arm stroke, accompanied by a very quick flutter kick. Look down at your hands just below the surface of the water as you do the breaststroke arm stroke. Keep the entire stroke within your range of vision.
- Step 2 : - Check for firm wrists and high elbows, especially at the corners. Practice until you feel you are holding on to the water in both directions. Start each new stroke from an extended arm position.
- Step 3 : - Still focusing on your hands, increase the rate of your arm stroke. Pick up speed through the corners and into the insweep. Practice until your arms are accelerating through the entire stroke. Your stroke should be moving fast enough so that you can clap your hands under your chin at the end of the insweep. Then, quickly return your arms to the starting point, fully extended.
- Step 4 : - Now focus on your quick flutter kick. Kick at a rate of at least one down-beat per second. Try to accomplish an entire arm stroke during three to four kicks. Watch your hands, checking that you are maintaining a compact stroke, firm wrists and high elbows, and accelerating into the insweep. When your hands return to the extended position, hold them there for six kicks before trying to do another complete arm stroke within the time of three to four kicks.
- Step 5 : - Continue practicing to the far end of the pool. Focus on the speed of your hands throughout each arm stroke, then return to the extended position and hold. Start each arm stroke from this still position, then attempt to go from zero to sixty within the time of three or four kicks.
DRILL FEEDBACK CHART
| Problem | Modification |
| Water wells up in the middle at the end of my insweep. | This shows that you have a good hold on the water, and are using good hand speed. Just make sure that you are not lifting that water upward, or you will be creating drag. When your hands meet at the end of your insweep, that is the end of the power phase, so just let go of the water and return your hands to the extended position. |
| It's hard to keep my head up. | Use core tension to lean downhill from hips to chest. Make sure you are not trying to keep your head too high out of the water. This stroke produces very few waves, so your mouth just barely has to clear the water. Also make sure you are pitching your hands thumbs-down for the outsweep, and thumbs-up for the insweep, and using a quick and accelerating stroke. |
| This is awkward with the flutter kick. | The flutter kick is meant to work like a metronome to help you achieve a quicker arm stroke. It also should allow you to fully focus more on the productivity of the arm stroke alone, without any assistance from the breaststroke kick. |
Med Hassan EL HAOUAT
Breaststroke with Fists
THE PURPOSE OF THIS DRILL
- Learning to feel the water with the forearm
- Understanding the changing elbow position
- Appreciating the role of the hand
HOW TO DO THIS DRILL
- Step 1 : - Push off the wall as if preparing to do the regular breaststroke. Before the first stroke, form closed fists with each hand.
- Step 2 : - Start the arm stroke. At first it may seem impossible to make forward progress without the paddles of your open hands. Stroke quickly, purposely positioning your arms so that the inside of your forearms press against the water throughout the arm stroke. This will require you to initiate your stroke with your arms extended, but elbows rotated high, then to maintain firm elbows while your fists sweep outward.
- Step 3 : - Accelerate the stroke main- taining high elbows as you turn the corners with your fists. Keep the stroke speed quick. Adapt your stroke to the handless paddle. When your hands approach the end of the insweep, then allow your elbows to fold inward in front of your rib cage, still pressing against the water with your forearms. Practice the change of elbow position again, letting your elbows come inward, but not back like chicken wings, and only at the end of the insweep. Continue to the far end of the pool.
- Step 4 : - Now push off again, this time with open hands. Swim regular breaststroke, using your hands as well as your forearms to press against the water in both direc- tions. Do a quick, accelerating stroke. Keep high elbows until the last part of the insweep.
- Step 5 : - Continue alternating lengths of fists and open hands until you are feeling the water with a paddle that includes both your hand and your forearm.
DRILL FEEDBACK CHART
| Problem | Modification |
| I am not moving. | Reposition your forearm so when your arm moves through the stroke, the inside of your forearm presses constantly against the water in both directions. |
| I am getting a lot of bubbles in my outsweep. | Make sure that your wrists are not pitched backwards. There should be a straight line from your elbow to your knuckles. Also, make sure that your entire fist is submerged so you don't pull air down into the water. |
| My elbows end up back like chicken wings. | This indicates your arms are stroking in the collapsed position. Work on keeping your elbows high through the entire outsweep corners and then draw your elbows firmly together just in front of your rib cage. |