
Unlike other strokes, the kick in the breaststroke produces more forward motion than the arm stroke. It also has a great deal of potential drag. It is a unique kick that uses rounded, lateral and completely splashless leg motion, where the soles of the feet push the water rather than the tops of the feet as in other strokes. The goal of the following breaststroke kicking drills is to experience positioning and, using the hips, knees and feet most advantageously, maximize forward motion, and minimize drag for the most effective breaststroke kick.
Duck Feet
THE PURPOSE OF THIS DRILL
- Learning to use your feet as paddles
- Using ankle rotation to keep hold of the water
- Avoiding potential drag
HOW TO DO THIS DRILL
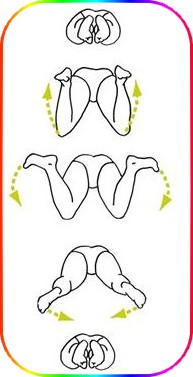
- Step 1 : - Observe a duck swimming in the water. Focus on its feet. They are a perfect swimming feet! They are wide and flexible, and very paddle-like. Looking closely at the kicking motion, although the duck kicks with alternating legs, the actual kicking motion is very similar to the breaststroke kick. Studying the motion of one foot, it shows a good example of how the human foot should move in the breaststroke kick. As the duck's foot prepares for the power phase of the kick, from front to back, it takes a flexed position, forming a right angle to the ankle. During the rounded sweep-back of the duck's kick, notice how the angle of the foot steadily changes, rotating from a flexed and pitched out starting position to a pointed, inwardly pitched position at the end of the kick. This changing foot position, produced by rotating the ankle, allows the duck to maintain pressure on the water most effectively with its foot at all stages of the kick, and create very effective forward motion.
- Step 2 : - Now observe the foot of the duck as it returns to the starting position for another kick. Notice that while the foot is pointed, it appears as it is retracted, reducing the size of the paddle. It also moves more slowly than during the power phase. This is the recovery of the duck's kick. The duck's foot slides back to the starting position without applying pressure on the water.
- Step 3 : - Keeping the duck's kicking technique in mind, get in the water, at least waist deep, and stand facing the wall of the pool. Hold onto the wall with both hands, arms extended. Draw one foot up behind you, so your heel is close to your buttocks. It should be completely submerged, and remain that way throughout the kick. Flex your foot, creating a right angle at your ankle. Also pitch your toes outward.
- Step 4 : - From this position, press the bottom of your foot against the water. Notice the water resistance on the bottom of your foot when it is flexed. Trace a rounded line with your foot, outward and then inward, until your leg is straight. Try it again with more speed. In order keep your foot pressing against the water as it makes the rounded sweep, the position of your foot must steadily change. Rotate your foot from the ankle to maintain the feeling of water resistance on the bottom of your foot. Practice this several times, increasing speed.
- Step 5 : - When you have achieved steady resistance on the bottom of your foot from the point where your foot starts near your buttocks, through the rounded sweep, until your leg is straight, then try to mimic the duck's foot recovery. As you bring your foot back up to the starting point, position it so you feel little or no resistance. Slide it through the water smoothly and with less speed. Once it reaches the starting position, flex your foot again and pitch your toes out preparing for another power phase. Practice this several times. Then practice the whole kick, power phase and recovery.
- Step 6 : - Once you are able to feel a difference in the resistance between the power phase and the recovery, try doing the kick with both legs simultaneously. Holding the wall with one arm extended, place the other hand lower on the wall so you can brace yourself easily in a horizontal position. Keep your feet submerged throughout the kick. Your feet should move as mirror images to each other. Draw both heels back toward your buttocks. Focus on using your feet like paddles to engage the water throughout the power phase. Done correctly, by the end of the kick, you should have to tense your arms to prevent yourself from advancing toward the wall. Slide your feet gently back to the starting point, so you don't feel any pull away from the wall. Practice the breaststroke kick several times.
DRILL FEEDBACK CHART
| Problem | Modification |
| My foot makes a splash. | Flex your foot, curling your toes up from the very beginning of the power phase. Kick with the sole of your foot, not the top of your foot as in all other kicks. |
| I feel resistance on the recovery. | It is important to learn to eliminate as much resistance as you can, because the kick recovery can actually move you backwards done incorrectly. Try keeping your knees still while you move your heels back and up slowly behind you. |
| I end up with the soles of my feet together by the end of the kick. | You are lucky to have excellent ankle flexibility. When you keep the soles of your feet positioned so they push against the water throughout the rounded sweep, outward, then inward, some people are able to clap the soles of their feet together at the last moment. Make complete use of your flexibility. |
Med Hassan EL HAOUAT

Breaststroke Kick on Your Back
THE PURPOSE OF THIS DRILL
- Developing a propulsive kick
- Avoiding folding at the hips
- Positioning your knees inside your feet
HOW TO DO THIS DRILL
- Step 1 : - Lay on your back in the water, hands at your sides, and slightly behind you, fingertips extended. Begin to kick breaststroke kick on your back. Bring your heels back to the point that they touch your fingertips. Then with your feet flexed and pointed outward, use a quick motion to trace a rounded sweep with your feet, outward then inward, maintaining water pressure on the soles of your feet until your legs are straight. Repeat several times, drawing your heels back slowly and smoothly, then engaging the water with the soles of your feet and pressing firmly against the water until your legs are straight.
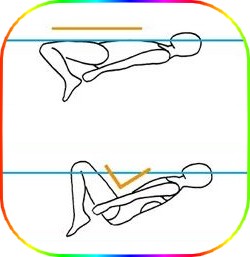
- Step 2 : - Now, continuing the same kicking action on your back, focus on your knees. They should remain under the surface of the water as your heels come back and touch your fingertips. If your knees are coming out of the water, it means you are folding at the hips. For many people, this causes a wave of water to wash over their face. If you were swimming on your front doing a breaststroke kick folded at the hips, that wave would work as drag, greatly slowing your forward motion. Try again, maintaining a straight line from your shoulders to your knees. Produce a knee bend by drawing your heels back, rather than by folding at the hips.
- Step 3 : - Still focusing on your knees, positioned under the surface of the water in a straight line from shoulder to knee, position them about shoulder width apart. As you draw your heels back to touch your fingertips, hold the position of your knees steady. Notice that with your knees held still, your feet will be farther apart than your knees when your fingertips touch your heels.
- Step 4 : - Continue your kick, holding your knees steady at shoulder width apart. Trace a rounded sweep with your feet, outward then inward, without your knees moving wider apart. Only at the very end of the kick, as your legs straighten do your knees also move, coming together as the feet also come together. Notice that with firm knees, your lower leg, ankle and foot are rotating around your knees as they sweep out and straighten. Practice again.
- Step 5 : - Once you are able to achieve a kick without folding at the hip, and you are able to maintain a stable knee position, try kicking with more force. You should be able to produce enough forward motion with each kick that you can glide in the straight leg position for three to five seconds before slowing down. Practice this several times.
DRILL FEEDBACK CHART
| Problem | Modification |
| My heels don't touch my fingertips. | Try swinging your heels outward more, when you are drawing your heels back. Remember the heels should be farther apart than the knees. |
| I get more power when I fold at the hips. | You might, but you also produce much more drag. In fact, kicking this way produces almost as much drag as it does forward motion, so your gain from each kick is practically nothing, as you go forward, then backward. Try using ankle rotation to position your feet, rather than folding at the hip. |
| My knees are farther apart than my feet. | This could mean you are drawing your feet up the middle. When you do this, you then have to do an additional step of swinging them laterally outward to prepare for the power phase. The drag of wide knees, moving in the opposite direction that you are headed, in addition to the drag of the extra movement to position your feet wide, is hard to overcome. Some swimmers successfully position their knees a bit wider than shoulder width apart, but they still keep them stable through the sweep of the power phase, until the very end when the legs straighten. In addition, their feet remain outside of their knees. |
Med Hassan EL HAOUAT
Vertical Breaststroke Kick
THE PURPOSE OF THIS DRILL
- Developing a productive kick
- Using foot speed during the power phase
- Eliminating drag
HOW TO DO THIS DRILL
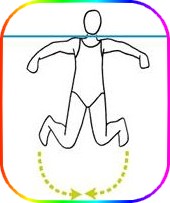
- Step 1 : - In water, at least as deep as you are tall, get into a vertical position. Begin a gentle sculling action (tracing side to side underwater figure eights with your hands) to keep your head above water.
- Step 2 : - To begin the power phase of the breaststroke kick, draw your heels back toward your buttocks. Use flexed feet, stable knees, and kick in a path that your feet rotate around your knees, without producing forward or backwards motion. Use a forceful and quick enough kick so that you bob upward with each kick as your legs straighten. Practice several times, with increasing foot speed.
- Step 3 : - Practice several times. While preparing for the power phase of the kick, avoid raising your knees toward your abdomen so that you don't pull yourself down underwater. Make sure your feet are in the flexed position before beginning the power phase of the kick.
- Step 4 : - Once you have achieved a productive vertical kick, stop the sculling action with your hands. Position your hands: left hand on right shoulder and right hand on left shoulder. Kick, keeping your head above water. Maintain for 30 seconds.
- Step 5 : - When you are able to keep your head up without the help of arm movements, try the advanced version of this drill: Position your arms so they extend side to side on the surface of the water. Now raise your hands out of the water, bending at a right angle at the elbow. Kick! Can you keep your head up for 30 seconds
DRILL FEEDBACK CHART
| Problem | Modification |
| I am not bobbing upward. | Use a faster, more forceful sweep, outward then inward with your feet. Make sure you are pushing water with the soles and not the tops of your feet. Also make sure your knees remain stable. |
| I am sinking. | Practice flexing your feet more, achieving a right angle to your ankle, curling your toes upward, and pitching your feet outward before you kick. You must use the soles of your feet like paddles and achieve constant pressure against the water throughout the power phase in order to stay up. Also, make sure that you are not drawing your knees up toward your abdomen, but drawing your heels up toward your buttocks instead. |
| This hurts my knees. | Breaststroke kick is not the easiest action for the knees. Modify your knee position so it is comfortable for you. Try adjusting your knees to be slightly farther apart. If it still hurts you, just don't do it. |
Med Hassan EL HAOUAT
Heads Up Breaststroke Kick
THE PURPOSE OF THIS DRILL
- Using your senses to recognize a productive kick
- Observing momentum
- Practicing an effective kick
HOW TO DO THIS DRILL
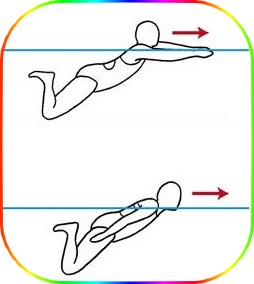
- Step 1 : - Push off the wall in a streamlined position, arms extended, clasping one hand over the other. Establish a stable hip position. ith your head up, allow your chin to rest on the surface of the water. Begin kicking breaststroke kick, keeping your feet completely submerged throughout each kick.
- Step 2 : - Notice your movement. During the power phase of the kick, you should be able to see your kick producing forward momentum. During the recovery phase of the kick, you should notice no slowing, or movement in the reverse direction. Feel your feet working like paddles during the power phase, pressing on the water. Feel your feet during the recovery, gently slipping back to the starting point without pressing on the water. Listen to your kick. It should not make a sound during the power phase or recovery.
- Step 3 : - Continue kicking with your head up, chin on the water, arms extended to the far end of the pool, looking, listening and feeling. Practice for several lengths of the pool, resting at each end.
- Step 4 : - Once you are able to produce an effective heads up kick with your arms extended, try the advanced version of this drill. Kick another length, but this time put your arms at your sides, keeping your head up and chin on the surface of the water.
- Step 5 : - Notice that with your arms at your sides, you must use a faster kick, and one with greater force to keep your face above water. Use a forceful kick that gains speed throughout its path, and a gentle recovery, until you can also produce forward momentum for a glide with every kick without your face submerging. Practice for several lengths of the pool, resting at each end.
DRILL FEEDBACK CHART
| Problem | Modification |
| I hear an occasional splash from my feet. | That splash indicates that your feet are not always connected to the water. Check that when you begin your power phase your feet are flexed, not pointed. Make sure your spine is not swayed, positioning your hips too high in the water to begin the kick with your feet submerged. |
| I can't produce a glide. | Make sure your are tracing a rounded path with your feet, outward then inward, not straight back. The breaststroke kick is a large sweeping kick. Make use of the whole thing to produce the most forward momentum. |
| With my arms down, I can't keep my face up. | This is not easy. As well as using good force during the power phase, your kick must also gain speed all the way until your legs are straight. You must produce little drag during the recovery. Your ankles must be active, adjusting the pitch of the feet throughout the kick. Your knees must be stable, so your lower legs and feet can rotate around them. |
Med Hassan EL HAOUAT
