Leverage in the backstroke adds potential power to the stroke, increases the range of motion at the beginning of the stroke, and enables the swimmer to sustain the stroke longer. It is achieved similar to freestyle, through the side to side rolling action of a unified core. The goal of the following leverage drills for backstroke is to learn to incorporate a productive roll into the stroke.
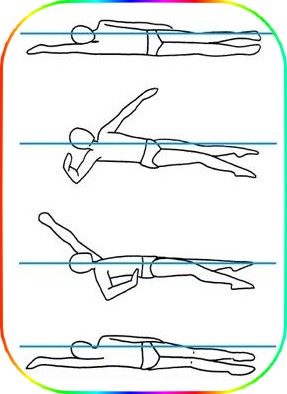
Three Strokes Switch Backstrok
THE PURPOSE OF THIS DRILL
- Benefiting from core leverage
- Feeling the roll into and out of each stroke
- Transferring power from the core to the limbs
HOW TO DO THIS DRILL
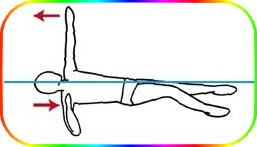
Step 1: Push off the wall preparing to do the backstroke, straight spine and good water-line. Perform three strokes (one arm = one stroke), accompanied by a pro- ductive kick. As your arm approaches your hip on the third stroke, float and kick in that position, with the arm that just finished its underwater stroke at your side, the other arm fully extended. You should not be floating flat in the water, but instead you should be mostly on your side with the arm at your side closer to the surface, and the arm extended over your head lower in the water. Your face should remain out of the water the whole time. Do six good kicks in this position (one leg = one kick).
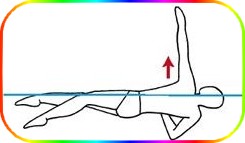
Step 2: With your sixth kick switch floating sides, by rolling toward the other hip and shoulder, but remaining face up. This roll should initiate three more strokes by bringing the high hip and shoulder down, and the low hip and shoulder up, while the arm at your side recovers over the water to the front, and the reaching arm begins its underwater stroke. Keep a steady kick through the whole process.
Step 3: Continue doing three strokes, kicking the whole time, and then six kicks in the side position until you reach the far end of the pool. Notice that your switch affects both arms at the same time.
Step 4: Repeat the drill, this time using three strokes and three kicks. As you become more comfortable, try to incorporate the switch between each stroke. Continue to the far end of the pool.
Step 5: Once you are able to roll productively with each stroke, begin swimming regular backstroke rolling into and out of each stroke, as you did in the drill. Practice for several length of the pool.
DRILL FEEDBACK CHART
| Problem | Modification |
|
I go crooked. |
Be sure your leading arm is aligned at 1:00. You can swim next to a lane line, or if you are at an indoor pool, watch the lines on the ceiling to go straight. |
| I don't roll as much in the three strokes as I do changing to the kick only phase. | Slow down your strokes. Allow time to roll. Use both hips and shoulders to roll. |
| I am struggling to keep my face up during the kick only phase. | Try using a quicker kick rhythm. Kick up towards the surface with more force. It is important to maintain your momentum during the kick only phase. |
Med Hassan EL HAOUAT

One Arm Rope Climb
THE PURPOSE OF THIS DRILL
- Learning to anchor your reaching arm
- Feeling the high elbow position of strength
- Experiencing your body moving past your hand
HOW TO DO THIS DRILL
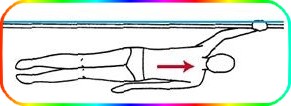
- Step 1 : - String a rope from one end of the pool to the other, attaching it securely to the lane rope hooks in the side of the pool. The rope should be fairly tight, floating just below the surface of the water.
- Step 2 : - Lay in the water on your back, one arm extended over your head, spine straight, good water-line, the rope just outside your extended arm. Grasp the rope with the hand of your extended arm. From this anchor point, pull your body past your hand, with a totally straight arm, moving your arm across the surface of the water, until the hand holding the rope is by your hip. Notice that as you move forward, no matter how much core stability you have, your legs swing toward the rope. Notice as well, that your shoulder is doing all the work.
- Step 3 : - Grasp the rope again with your arm extended over your head. This time, drop your elbow down, lowering it into your ribs as you attempt to move your body past your anchored hand. Notice that it is very difficult to move your body forward with your elbow low and moving.
- Step 4 : - Again, grasp the rope with your arm extended over your head. This time, pull your body up so that your shoulder is at the same level as your hand. your elbow to bend up to a right angle, but remain about parallel to your shoulder and hand. From this point, straighten your arm. Keep your elbow firm as your body moves past your anchored hand. Notice that by keeping your elbow firm you have more leverage to move yourself forward. It is also easier and more productive than the other two ways that you tried.
- Step 5 : - Continue the one arm rope climb using a high, stable elbow, and an accelerating arm action. When you reach the far end of the pool, switch arms. Practice several times with each arm. Once you are able to clearly feel yourself move past your anchored hand, begin swimming regular back- stroke, anchoring your hand in the water, and again move your body past that point with each stroke.
DRILL FEEDBACK CHART
| Problem | Modification |
| I end up under the rope. | Align the hand grabbing the rope with outside of your shoulder, and keep it outside of your shoulder the entire time. |
| It puts strain on my shoulder to pull with my arm straight. | Exactly. This part of the drill is designed as a contrast to doing the arm stroke correctly. It shows that the straight arm pull over-taxes the shoulder, where as the high elbow bent arm stroke allows you to stroke comfortably without pain. |
| I am not producing a glide. | Make sure your elbow in positioned high from the start. Move your body past your hand and elbow. Accelerate through to the end of the stroke. |
Med Hassan EL HAOUAT
Opposition Freeze Frame
THE PURPOSE OF THIS DRILL
- Understanding the role of opposition in backstroke leverage
- Checking opposition at various stages in the stroke
- Learning to maintain opposition
HOW TO DO THIS DRILL
- Step 1 : - Push off the wall on your back, with both arms at your sides. Kick productively. With your right arm, do one complete backstroke, bringing your arm over the water in a fully aligned arch, then stroking through to your hip. When your right arm returns to its starting point, do the same thing with your left arm. Continue for twelve strokes. Notice that the forward motion you produce is not continuous, so that when your left arm is at your side and your right arm is in the air recovering, nothing is moving you forward except your kick. Notice too that it is difficult to roll into and out of your stroke, accessing core leverage. This is an example of backstroke without opposition.
- Step 2 : - Now, push off the wall with both arms extended over your head, preparing to do the backstroke, spine straight, good water-line, productive kick, locked elbows, hands pitched out. Establish opposition by doing an underwater stroke with one arm, while the other remains over your head. Roll toward the side of your body with the arm extended, so that side of your body becomes lower in the water. Now, begin swimming backstroke, focusing on maintaining opposition.
- Step 3 : - Swim six strokes at a good strong pace. On the next stroke, freeze when your right hand has entered the water. Notice where your left hand is. It should be at the opposite extreme of the stroke, exiting the water past your hip.
- Step 4 : - Continue swimming backstroke. After six strokes, freeze again as your right hand transitions from pull to push. Notice where your left hand is. It should be opposite, in the middle of the recovery.
- Step 5 : - Continue swimming backstroke. After each six strokes, freeze at a different point in the stroke, checking your opposition.
DRILL FEEDBACK CHART
| Problem | Modification |
| My arms don't stay opposite. | Focus on the position with one arm extended over your head, and the other arm at your side. Use that as your home base. Find that position between each stroke, before starting the next one. |
| I don't have opposition in the middle of the stroke. | It might be that you are swimming too flat. In the middle of the stroke, you should be transitioning from pull to push with one arm, and passing the high point in the arch of the recovery with the other arm. The recovering side should be higher in the water than the side with underwater arm |
| If I don't bring both arms down when I push off, I can't get my face out of the water. | Use a quicker kick to get you most of the way to the surface, then stroke strongly with one arm to get into a swimming position with your face up. Practice this. It is very important. |
Med Hassan EL HAOUAT
Armpit Lift
THE PURPOSE OF THIS DRILL
- Balancing the recovery arm with the stroking arm
- Using core leverage
- Developing a unified stroke
HOW TO DO THIS DRILL
- Step 1 : - Push off the wall preparing to do the backstroke, straight spine, good water-line, productive kick. Establish opposition. Roll into and out of each stroke.
- Step 2 : - As your recovering arm approaches the top of the arch over the water, lift your armpit out of the water by rolling your opposite shoulder down lower into the water. Keep your elbow locked, and your hand aligned above your shoulder. When your recovering arm approaches the entry point beyond your shoulder, allow your armpit to submerge again.
- Step 3 : - Recover with the other arm. Notice that when you lift the armpit at the top of the recovery arch, it affects the underwater stroking arm. Correctly balanced, lifting your armpit helps your other arm to transition from the pull phase to the push phase of the stroke, and, to produce important arm speed at the finish of the stroke.
- Step 4 : - Continue stroking, and with each recovery, lift your armpit out of the water during the highest part of the arch. Continue for several lengths of the pool until you feel that the action of lifting your armpit balances the actions of the stroking arm. It should feel that the arms are working together, yet opposite.
DRILL FEEDBACK CHART
| Problem | Modification |
| I sink when I lift my armpit. | It sounds like your arms are not balancing each other. When you are lifting the armpit of your recovering arm, the other arm should be bent at the elbow at approximately a right angle, your elbow high and stable. That hand should be gaining speed and beginning to push towards your feet. In any other relationship to each other, your stroke will not benefit from the armpit lift. |
| My feet fish-tail. | It is important for your recovering arm to remain aligned with its exit point and same side shoulder. Avoid entering the water with your hand at 12:00. Over-reaching like this will disrupt your alignment, causing you to fish-tail. |
| This seems to make my stroke pause. | Think of it as a transition instead of a pause. Both the recovering arm and underwater arm are moving at the point of the armpit lift. There should be no pause, just a feeling the arms are balancing each other and unified in their action. |