Without your face in the water, it would seem that breathing drills for backstroke are a low priority. The opposite is true. Because rhythmic breathing is an essential part of sustaining any swimming stroke, learning to develop a good breathing rhythm in the backstroke is a top priority. In addition, because the power of the backstroke kick is upward, against gravity, frequent oxygen exchange is required. Many swimmers dislike backstroke because water gets in their face. Learning to time the breathing to the rhythm of the waves of the stroke, makes the backstroke much more enjoyable. The goal of the following backstroke breathing drills is to develop rhythmic breathing and more a comfortable, productive backstroke.
Rhythmic Breathing Sequence
THE PURPOSE OF THIS DRILL
- Experimenting with different breathing rhythms
- Matching the stroke rate and the breathing rhythm
- Becoming comfortable breathing in the backstroke
HOW TO DO THIS DRILL
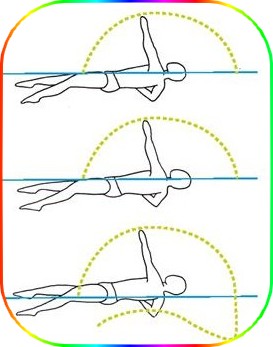
- Step 1 : - Stand with your hand on your abdomen, between your breastbone and your belly button. Close your eyes and breathe normally. Feel the rhythm of your breathing as you inhale and exhale. Now, maintaining the same rhythm, breathe as if you were in the water, inhaling through your mouth and exhaling through both nose and mouth.
- Step 2 : - Now, in the pool, push off the wall preparing to do the back- stroke, spine straight, good water-line, produc- tive kick, locked elbows, hands pitched out. Try to duplicate the breathing rhythm you did on land. Swim at a rate so that your inhale happens as one arm recovers, and your exhale happens when the other arm recovers. Continue for several lengths of the pool, resting at the end of each length.
- Step 3 : - Next, try a quicker stroke rate. Match your breathing to your quicker stroke rate, inhaling on one arm, and exhaling on the other. Notice, that with a quicker stroke rate, this breathing rhythm doesn't work as well. There is not time to fully inhale or exhale. Change your breathing rhythm to inhale with one full stroke cycle (one stroke with each arm), and then exhale on the next stroke cycle. Notice that your breathing rhythm more closely resembles your normal breathing rhythm using this timing. Continue for several lengths of the pool, resting after each length.
- Step 4 : - Now, try a stroke rate that is very relaxed and easy, perhaps resembling warm-up speed. Inhale with one stroke cycle, exhale with the next. Notice, that at this slower stroke rate, this breathing rhythm doesn't work as well. The exchange of air is not frequent enough. Change your breathing rhythm so you are both inhaling and exhaling with each arm recovery, doing the same thing on the next arm. Notice that the breathing rhythm is now more normal. Continue for several lengths of the pool, resting after each length.
DRILL FEEDBACK CHART
| Problem | Modification |
| As I get tired, my breathing gets irregular. | Maintain a regular breathing rhythm as long as you can, then rest and try it again. As you practice more, you will be able to hold on to the rhythm for longer. |
| I can't maintain the rhythm when water gets in my face. | It is hard to get used to water washing over your face, but with practice, and increased momentum, you will notice a pattern to most of the splashes. This will help with your breathing timing. |
| When I go faster, I need more air, so I breathe more frequently. | If inhaling with one arm and exhaling with the other arm isn't frequent enough, try inhaling and exhaling with each arm. If that is not frequent enough, slow down your stroke rate, and try to make more forward progress with each stroke in order to go faster. |
Med Hassan EL HAOUAT

The Breathing Pocket
THE PURPOSE OF THIS DRILL
- Using the ebb and flow of the water to time your breathing
- Finding another benefit of the roll in and out of the stroke
- Becoming comfortable when breathing in the backstroke
HOW TO DO THIS DRILL
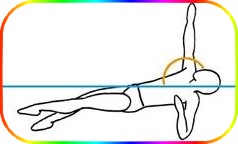
- Step 1 : - Push off the wall preparing to do the backstroke, spine straight, good water-line, productive kick, locked elbow recovery, dog-eared hand. Focus on rolling into and out of each stroke, feeling opposition. Take several strokes, then freeze at the point that one arm is in mid-stroke under- water, and the other arm is in mid-recovery. At this point, the armpit of your recovering arm should be completely out of the water, and the shoulder of the other arm should be at its lowest point under the water.
- Step 2 : - Observe that in this position and point in the stroke, the raised armpit side forms a barrier to the water that would otherwise be in your face. Resume stroking. Notice that this barrier is only in place for a very brief moment. This is your breathing pocket. It is your chance to inhale without water going in your face.
- Step 3 : - Swim backstroke again, exaggerating your roll to make the breathing pocket very clear. Try to find the breathing pocket on each side of your body. Continue swimming backstroke inhaling in your breathing pocket with each stroke.
DRILL FEEDBACK CHART
| Problem | Modification |
| I still get water in my face. | Work on maintaining your spine straight and a good water-line. Make sure your kick is productive without any bicycling action. Try rolling more. |
| Water still goes over my face when I exhale. | That is fine. As long as you are exhaling through your nose and mouth, water won't go in. |
| I have a better breathing pocket on one side. | This indicates that you are rolling more on one side than the other. It would be best to work on developing a symmetrical roll so that you have equal breathing pockets, and have more choices in changing your breathing pattern. |