With the long, sweeping, alternating arm action of the freestyle stroke, humans are capable of producing the most potential speed of all the strokes. To develop an efficient freestyle, the swimmer must be concerned with three things. First, achieving correct alignment is crucial to begin the stroke from a position of strength. Second, maintaining a high elbow position is important to hold on to the water. Third, accelerating through the arm stroke is necessary to fully benefit from the stroke action. The goal of the following arm stroke drills for freestyle is to develop a productive arm stroke, to make the most of the power phase of the stroke.
 Pull/Push Freestyle
THE PURPOSE OF THIS DRILL
- Feeling the path of the freestyle arm stroke
- Achieving a high elbow position
- Using the full length of the stroke
HOW TO DO THIS DRILL
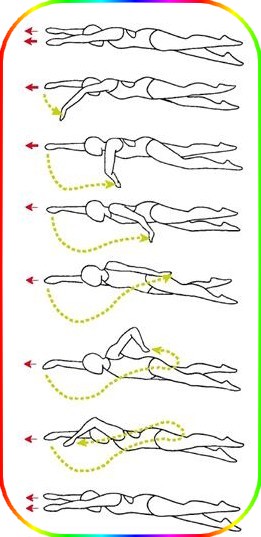
- Step 1 : - Push off the wall, face down, arms extended, core engaged, looking at the bottom of the pool. Establish a continuous flutter kick.
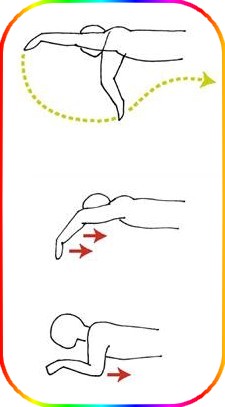
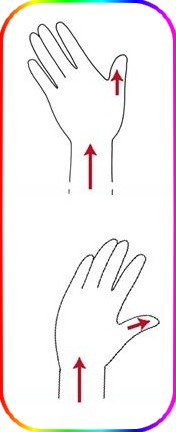
- Step 2 : - Do a freestyle arm stroke with your right arm. Start by pitching your fingertips and the palm of your hand down slightly, adjusting them to press back on the water, instead of pressing down. Allow your forearm to follow, but keep your elbow high and firm. Sweep your hand slightly outward and down, then inward until it lines up under your shoulder. At this point, your elbow should be in line with your hand and shoulder, but sticking out as if you were trying to nudge someone. This is the pull portion of the freestyle arm stroke.
- Step 3 : - From there, press back quickly on the water with your hand. Feel your hand pass your elbow. Adjust the pitch of your hand to maintain pressure back on the water. Sweep your hand back until your arm is straight. Your hand should pass your hip and finish with your thumb touching your thigh. This is the push portion of the freestyle arm stroke.
- Step 4 : - Return your hand over the water to the front reaching position. When it passes your shoulder, begin the arm stroke with your left arm, pitching your fingertips and hands downward and allowing your forearm to follow. Press back on the water until your hand lines up under your shoulder, with your elbow pointed out to the side. Then press back quickly past your elbow until your arm is straight, past your hip. Notice that as your stroke goes from pull to push, it also goes from deeper to shallower.
- Step 5 : - Bring your arm left back to the front over the water, starting the next stroke with your right arm when the left arm passes your shoulder out of the water. Continue stroking. Use the full length of each arm stroke. Maintain a high elbow position. Feel the pull and the push of each stroke. Practice for several lengths of the pool until you can clearly distinguish the pull and the push motions of the freestyle stroke.
DRILL FEEDBACK CHART
| Problem | Modification |
| I don't feel the pull. | Keep your elbow still while you start the stroke with your hand. Pitch your fingertips and palm downward. Press back on the water, not down. |
| I don't feel the push. | Keep your elbow high and firm. Allow your hand to push past it. If your elbow drops back, you won't be able to accomplish the push well. Accelerate the motion toward your hip. |
| I can't do many strokes because I have to stop and breathe. | Take a big breath and do four to six long strokes, then stand, breathe, and start again. |
Catch Up
THE PURPOSE OF THIS DRILL
- Practicing a long stroke
- Feeling acceleration in the arm stroke
- Developing a high elbow underwater arm stroke
HOW TO DO THIS DRILL
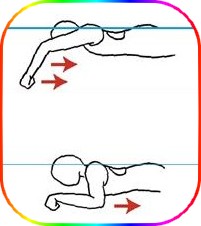
- Step 1 : - Push off the wall, face down, arms extended, core engaged, looking at the bottom of the pool. Your arms should be aligned in front of your shoulders, not in front of your nose. Establish a continuous flutter kick, which should be maintained throughout the drill.
- Step 2 : - With your right arm still extended and aligned with the shoulder, perform a single freestyle arm stroke with your left arm. With your fingertips and palm pitched down slightly, press back on the water, not down. Keep your elbow high and firm as your forearm follows your hand. Pull then push, sweeping your hand from deep to shallow toward your hip, accelerating the motion from front to back, until your arm is straight at your side.
- Step 3 : - From this position, your right arm extended in front of you, and left arm at your side, feel the full length of your stroke. Return the left arm over the water to the starting point, so both arms are again at full extension. Then, perform a single stroke with your right in the same manner.
- Step 4 : - This sequence continues as one arm catches up to the other at the front of the stroke. Breathing is performed as needed, toward the moving arm, as the hand accelerates to the back of the stroke. Roll your face to the side to get a new breath. Keep the reaching arm extended and aligned with the shoulder as you inhale. Return your face to the water as your arm passes over the water.
- Step 5 : - Continue for several lengths of the pool. Feel the momentum of each arm stroke as you press back on the water, accelerating through the pull, then push to full extension. Notice that there is always one arm leading and one arm stroking.
DRILL FEEDBACK CHART
| Problem | Modification |
| My arm gets stuck underwater at the end of the stroke. | Begin the stroke by moving the hand, while the elbow remains still and high. Your hand should pass your elbow and extend to a straight arm position at the back, enabling you to clear the water. |
| I'm not moving. | Position your hands to press back on the water, not down toward the bottom of the pool. Pull then push the water toward your feet, accelerating through the stroke. |
| My arm sinks when I breathe. | When turning, breathe, reach forward with extended arm instead of pressing down. |
All Thumbs Drill
THE PURPOSE OF THIS DRILL
- Learning to avoid over-reaching to the center at entry
- Practicing aligned extension
- Initiating the arm stroke from a position of strength
HOW TO DO THIS DRILL
- Step 1 : - On land we point at things using our pointer finger. Try it. Notice that this is largely a hand only position, and that the rest of the arm is not involved in the pointing motion. In swimming, because the purpose of pointing is to align our stroke forward, we use the whole arm. To best accomplish this, we have to learn to point with our thumbs.
- Step 2 : - Standing in the water, extend your arm fully in front of you. Use your thumb to point to the far end of the pool. Notice when you point with your thumb, your shoulder, the inside of your elbow, and your thumb all align and aim forward. There is no bending at the wrist or elbow that makes a swimmer over-reach to the center, aim off course. Notice how your fingers are pitched outward, creating a wonderful paddle to catch water.
- Step 3 : - Now try it while swimming. While your arm enters the water and extends forward, point in the direction you are going with your thumbs. Reach to full extension by pushing your elbow and wrist in a straight line. Notice the alignment: shoulder, the inside of your elbow, and your thumb all line up straight ahead. You should feel like you are almost gliding forward directly toward your destination. Swim, thumbs leading to the far end of the pool.
- Step 4 : - Continue to practice beginning your stroke aligned forward with your thumbs. Pitch your fingertips and palm downward, your thumb slightly lower than your pinkie. Feel the water against your fingertips take hold of the water like a handle. Move your body forward past your hand. Notice that when you begin the stroke from a well aligned position, you are able to feel more of a handle on the water.
- Step 5 : - Practice more, beginning each new stroke from this position of strength with your thumbs leading. Feel the length of your stroke increase. Feel yourself move through the water farther with each stroke as you access more power.
DRILL FEEDBACK CHART
| Problem | Modification |
| It feels awkward. | It probably feels much wider than you are used to. Remember, over-reaching to the center at entry is a big contributor to shoulder pain in swimming. Practice more. Align your reaching arm and thumb with the line on the bottom of the pool. |
| I don't feel the water against my fingertips. | Adjust the pitch of your hand. Keeping your thumb forward, allow the tips of your fingers to enter the water slightly before the heel of your hand. Slide your hand into the water, and forward as far as it will go. |
| I can't feel the alignment. | Push your elbows forward to align with your thumb. Maintain your downhill floating position. |
Sculling
THE PURPOSE OF THIS DRILL
- Developing feel for the water
- Learning to hold on to the water
- Practicing changing hand pitch
HOW TO DO THIS DRILL
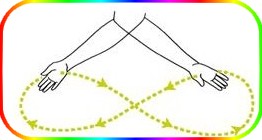
- Step 1 : - Standing in shoulder-deep water, position your hands completely underwater, palms facing each other, about 24 inches apart. Hold your elbows firmly against your body. Sweep your hands towards each other. Just before they meet, sweep your hands down and back away from each other about 24 inches apart. Notice your hands have gone from a thumbs-up to a thumbs-down position.
- Step 2 : - Upon reaching the widest point, again sweep your hands down and around until they are moving towards each other. Notice that your hands have gone from a thumbs-down position to a thumbs-up position. Continue this action until you feel you are tracing a sideways figure eight with each hand.
- Step 3 : - You should be feeling that your hands are holding something of substance. Some swimmers describe the feeling of holding gelatin, others refer to pressing against something solid. Hold on to this substance in both directions, and as you turn the corners of your figure eight. This is sculling.
- Step 4 : - Now lay in the water, face down, in a hand lead position. Accompanied by a light flutter kick, begin sculling with your arms extended. Adjust your hands so they remain completely submerged. Press outward with your thumbs down, and inward with your thumbs up. Hold on to the water throughout the sculling action. Attempt to create forward motion for 30 seconds.
- Step 5 : - In the same floating position, move your hands under your belly, and using your sculling action, attempt to create forward motion in this position for 30 seconds.
- Step 6 : - In the same floating position, move your hand to your sides, and using your sculling action, attempt to create forward motion in this position for 30 seconds.
- Step 7 : - Once you have developed the ability to hold on to the water while sculling, try it when swimming freestyle. As your arm accelerates from front to back, feel the elongated sculling action. Hold on to the water throughout the whole path of the stroke. Adjust your hand as it sweeps through the stroke to maintain your hold on the water.
DRILL FEEDBACK CHART
| Problem | Modification |
| I don't feel a thick substance in my hands. | Make sure your hands are completely submerged in the water. Use a quicker sweep. Hold your wrists firm. Experiment with pitching your hands slightly downward from the wrist. |
| I don't move anywhere. | Use a quicker sweep in both directions. Avoid pressing the water inward and outward on the same path. Trace a figure eight. |
| The scull at my sides doesn't work. | Make sure that your elbows are not moving too much. Hold them firm and press outward and inward quickly with your hands. |
Fist Freestyle
THE PURPOSE OF THIS DRILL
- Learning to feel the water with the forearm
- Understanding the importance of a stable, high elbow
- Appreciating the role of the hand
HOW TO DO THIS DRILL
- Step 1 : - Push off the wall preparing to do regular freestyle. Before the first stroke, form closed fists with each hand.
- Step 2 : - Start the arm stroke. At first it may seem impossible to make forward progress without the paddle of your open hand. Keep sweeping through the path of the stroke, positioning your arm so your forearm works as your paddle to press against the water. To achieve this, you must keep your elbows high and stable, and to move your fists past your elbows.
- Step 3 : - Use the whole length of the stroke, front to back. Align the entry. Keep your elbows high. Accelerate the underwater stroke. Adapt your stroke to the handless paddle. Continue to the other end of the pool.
- Step 4 : - Now push off again, this time with open hands. Swim regular freestyle, using your hand as well as your forearm to press against the water. Align your entry. Keep your elbow high. Accelerate your stroke.
- Step 5 : - Continue alternating lengths of fist and open hand freestyle until you are feeling the water with a paddle that includes both your hand and your fore- arm.
DRILL FEEDBACK CHART
| Problem | Modification |
| I am not moving. | Reposition your forearm so when your arm moves through the stroke, it quickly becomes perpendicular to the surface of the water. |
| I am feeling a lot of bubbles. | Entering the water with your fist will bring more air down into the water than your open hand. Perform the entry gently, and extend fully before you start the underwater arm stroke. Leave the bubbles behind as you change directions when your arm begins to press back on the water. |
| My elbows keep moving. | Try sticking your elbows out through the beginning and middle of the underwater arm stroke, as if trying to nudge someone. Hold them there while you move your hand past them. |